project preview
Folder Structure:
- First we will need a folder for our project ex: Password Generator etc.
- Then create files inside it index.html, style.css, and script.js
- At last link css and js files in html files to get start
Introduction:
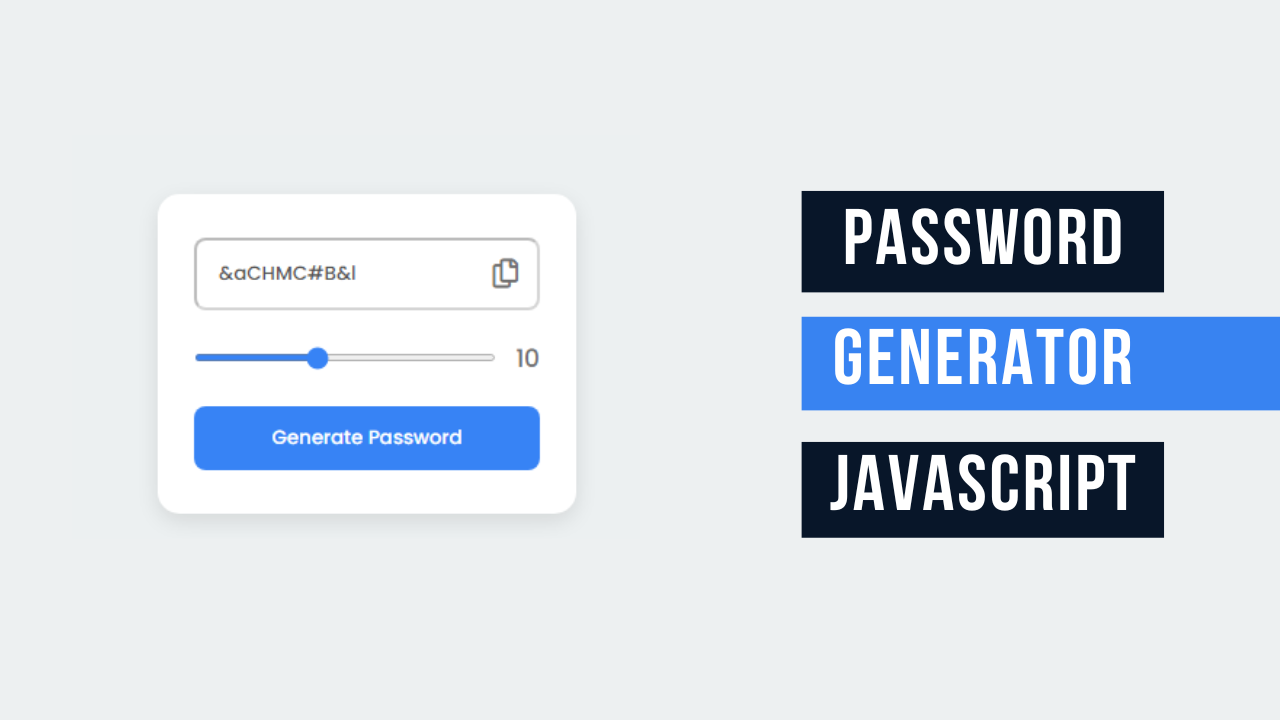
In this project, we are going to teach you how to create a random password generator using javascript. The tool will allow users to generate strong, random passwords with customizable lengths, ensuring security for their accounts. The user interface will include a sleek design with a range slider to select the password length and a button to generate the password. Additionally, there will be a feature to easily copy the generated password to the clipboard. This project is perfect for enhancing your web development skills, particularly in JavaScript.
HTML Code:
...
<!DOCTYPE html>
<html lang="en">
<head>
  <meta charset="UTF-8">
  <meta name="viewport" content="width=device-width, initial-scale=1.0">
  <title>Random Password Generator in JavaScript</title>
  <link rel="stylesheet" href="style.css">
  <link rel="stylesheet" href="../fontawesome/css/all.min.css">
</head>
<body>

  <div class="wrapper">
    <div class="pas_box">
      <input type="text" placeholder="Generate Password" disabled>
      <i class="far fa-copy copy_icon"></i>
    </div>
    <div class="range_box">
      <input type="range" min="6" max="16" value="8">
      <span class="slider_num">8</span>
    </div>
    <button class="generate_button">
      Generate Password
    </button>
  </div>

  <script src="script.js" defer></script>
</body>
</html>
...
Explanation:
The <body> contains a div with the class “wrapper,” which acts as the main container for the content. Inside this wrapper, there’s a div with the class “pas_box,” which contains a disabled input field for displaying the generated password and an icon (<i> tag) for copying the password, styled using Font Awesome classes.
Below the password box, a div with the class “range_box” is provided. It contains a range input for selecting the length of the password, along with a span element to display the current value of the slider. Finally, there’s a button element with the class “generate_button” that, when clicked, triggers the password generation process.
CSS Code:
...
@import url('https://fonts.googleapis.com/css2?family=Poppins:wght@500&display=swap');

* {
  padding: 0;
  margin: 0;
  box-sizing: border-box;
  font-family: "Poppins", sans-serif;
}

html,
body {
  display: grid;
  height: 100%;
  place-items: center;
  background: #ecf0f1;
}

.wrapper {
  position: relative;
  max-width: 300px;
  width: 100%;
  border-radius: 15px;
  background: #fff;
  padding: 30px 25px;
  box-shadow: 0 5px 15px rgba(0, 0, 0, 0.1);
}

.wrapper .pas_box {
  position: relative;
  height: 50px;
}

.pas_box input {
  height: 100%;
  width: 100%;
  border-radius: 8px;
  padding: 0 45px 0 15px;
  background-color: transparent;
}

.pas_box .copy_icon {
  position: absolute;
  right: 15px;
  top: 50%;
  color: #707070;
  cursor: pointer;
  font-size: 20px;
  transform: translateY(-50%);
}

.copy_icon:hover {
  color: #3783f5;
}

.wrapper .range_box {
  display: flex;
  align-items: center;
  margin-top: 20px;
}

.range_box input {
  width: 100%;
  height: 5px;
  accent-color: #3783f5;
  cursor: pointer;
}

.range_box .slider_num {
  min-width: 30px;
  font-size: 17px;
  text-align: right;
  color: #707070;
}

.wrapper .generate_button {
  width: 100%;
  color: #fff;
  padding: 12px 0;
  background: #3783f5;
  margin-top: 20px;
  border: none;
  border-radius: 8px;
  cursor: pointer;
}

.generate_button:hover {
  background-color: #226ede;
}
...
Explanation:
It begins by importing the “Poppins” font from Google Fonts, which gives the text a smooth and professional appearance.
The universal selector (*) resets the default browser styles by setting padding, margin, and box-sizing for all elements to 0, ensuring consistency across different browsers. The font-family is set to “Poppins” across the entire document, making sure all text uses the imported font.
The html and body selectors apply grid-based centering to the entire page using display: grid and place-items: center. This positions the content in the center of the viewport, both horizontally and vertically, creating a balanced layout.
The height of the viewport is set to 100%, ensuring that the content occupies the full height of the screen. A soft, neutral background color #ecf0f1 is applied to the body, which contrasts well with the white elements and creates a visually pleasing environment.
The .wrapper class styles the main container, setting a max-width of 300px to keep the content compact and centered on the screen. It is set to width: 100% to ensure it is responsive. The border-radius: 15px gives the container rounded corners, which softens the design.
A white background (background: #fff) is used, providing a clean canvas for the elements inside. The padding (padding: 30px 25px) adds space inside the container, making it comfortable to interact with, and the box-shadow (box-shadow: 0 5px 15px rgba(0, 0, 0, 0.1)) creates a subtle 3D effect, making the container appear slightly elevated from the background.
Inside the wrapper, the .pas_box class positions the password input field relative to its container, ensuring that elements inside can be positioned using absolute values.
The input field within .pas_box is styled with a height of 100% and width of 100%, ensuring it fills the available space. The border-radius (border-radius: 8px) and padding (padding: 0 45px 0 15px) enhance its appearance, while the transparent background allows the underlying white container to show through, creating a seamless look.
The .copy_icon class, which styles the Font Awesome copy icon, is positioned absolutely within the .pas_box, ensuring it stays in the top-right corner of the input field.
The icon is given a light gray color (color: #707070) to match the overall aesthetic, and its size is set to 20px. The hover effect (.copy_icon:hover) changes the icon color to a blue shade (#3783f5), providing a clear visual cue that it is interactive.
The .range_box class handles the layout of the range slider and its associated value. It uses display: flex to align the elements horizontally, and align-items: center to vertically center them. The margin (margin-top: 20px) adds space between the slider and the password box above.
The range input itself is styled with a custom height and the accent-color: #3783f5 property, which changes the color of the slider thumb and track to match the design’s primary blue color.
The .slider_num class controls the appearance of the number next to the slider, setting a minimum width (min-width: 30px) to ensure it stays readable. The font size (font-size: 17px) and text color (color: #707070) are chosen to harmonize with the overall style.
Finally, the .generate_button class styles the “Generate Password” button, making it full-width (width: 100%) and adding a comfortable padding (padding: 12px 0).
The button’s background is the same blue color used throughout (background: #3783f5), with white text (color: #fff). The border-radius (border-radius: 8px) ensures consistency with other elements, and the hover effect (.generate_button:hover) darkens the button slightly (background-color: #226ede), providing interactive feedback to the user.
JavaScript Code:
...

const passInput = document.querySelector(".pas_box input"),
copyIcon = document.querySelector(".pas_box .copy_icon"),
rangeInput = document.querySelector(".range_box input"),
sliderNum = document.querySelector(".range_box .slider_num"),
generateButton = document.querySelector(".generate_button");

// All Characters
let allCharacters =
"abcdefghijklmnopqrstuvwxyzABCDEFGHIJKLMNOPQRSTUVWXYZ0123456789^!&$%|[]{}():;.,*+-#@<>~";

const generatePassword = () =>{
  let newPassword = "";

  for (let i = 0; i < rangeInput.value; i++){
    let randomIndex  = Math.floor(Math.random()* allCharacters.length);
    newPassword += allCharacters[randomIndex];
  }
  passInput.value = newPassword;
  copyIcon.classList.replace("fas", "far");
}

rangeInput.addEventListener("input", () => {
    sliderNum.innerText = rangeInput.value;
    generatePassword();
});

copyIcon.addEventListener("click", () => {
    navigator.clipboard.writeText(passInput.value);

    copyIcon.classList.replace("far", "fas");
});

generateButton.addEventListener("click", generatePassword);

generatePassword();
..
..
Explanation:
It starts by selecting and storing references to key elements from the HTML using document.querySelector. These elements include the password input field (passInput), the copy icon (copyIcon), the range slider (rangeInput), the span showing the slider value (sliderNum), and the generate button (generateButton). These references allow the script to interact with and manipulate these elements dynamically.
The script then defines a string variable allCharacters, which contains all possible characters that can be used to generate the password. This string includes lowercase and uppercase letters, digits, and a variety of special characters. By using a broad range of characters, the generated passwords can be strong and secure, minimizing the risk of being easily guessed or hacked.
The main function in the script is generatePassword(). This function is responsible for generating a new random password each time it’s called. It starts by initializing an empty string newPassword. The function then uses a for loop that runs a number of times equal to the value selected on the range slider (rangeInput.value). Inside the loop, Math.random() generates a random number between 0 and 1, which is multiplied by the length of the allCharacters string.
This random number is then converted to an integer using Math.floor() to get a valid index within the allCharacters string. The character at this index is appended to newPassword, building the password one character at a time. Once the loop completes, the generated password is assigned to the value of the input field (passInput.value), displaying it to the user.
Additionally, the copy icon’s class is updated using copyIcon.classList.replace("fas", "far"), ensuring it reflects that no password has been copied yet.
Event listeners are then added to various elements to handle user interactions. The rangeInput element has an event listener for the “input” event, which triggers every time the slider is moved. When this happens, the value of the slider is displayed in the sliderNum span, and the generatePassword() function is called to generate a new password automatically, updating the input field with the new password.
The copyIcon element also has an event listener, but for the “click” event. When the user clicks the copy icon, the script uses the navigator.clipboard.writeText() method to copy the current password from the input field to the clipboard. After copying, the icon’s class is changed from far (an empty star) to fas (a solid star) to visually indicate that the password has been successfully copied.
The generateButton element has an event listener that triggers the generatePassword() function when clicked. This allows the user to manually generate a new password at any time by pressing the button.
Finally, the generatePassword() function is called immediately after the script loads, ensuring that a password is generated and displayed by default when the page is first opened. This provides an instant example to the user, enhancing the usability of the tool right from the start.
Source Code:
Download “Password-Generator.zip” Password-Generator.zip – Downloaded 269 times – 1.86 KB
Conclusions:
In this project, we successfully built a random password generator using HTML, CSS, and JavaScript. We created a user-friendly interface that allows users to generate strong, customizable passwords, with the added functionality to easily copy the password to the clipboard.
