Introduction
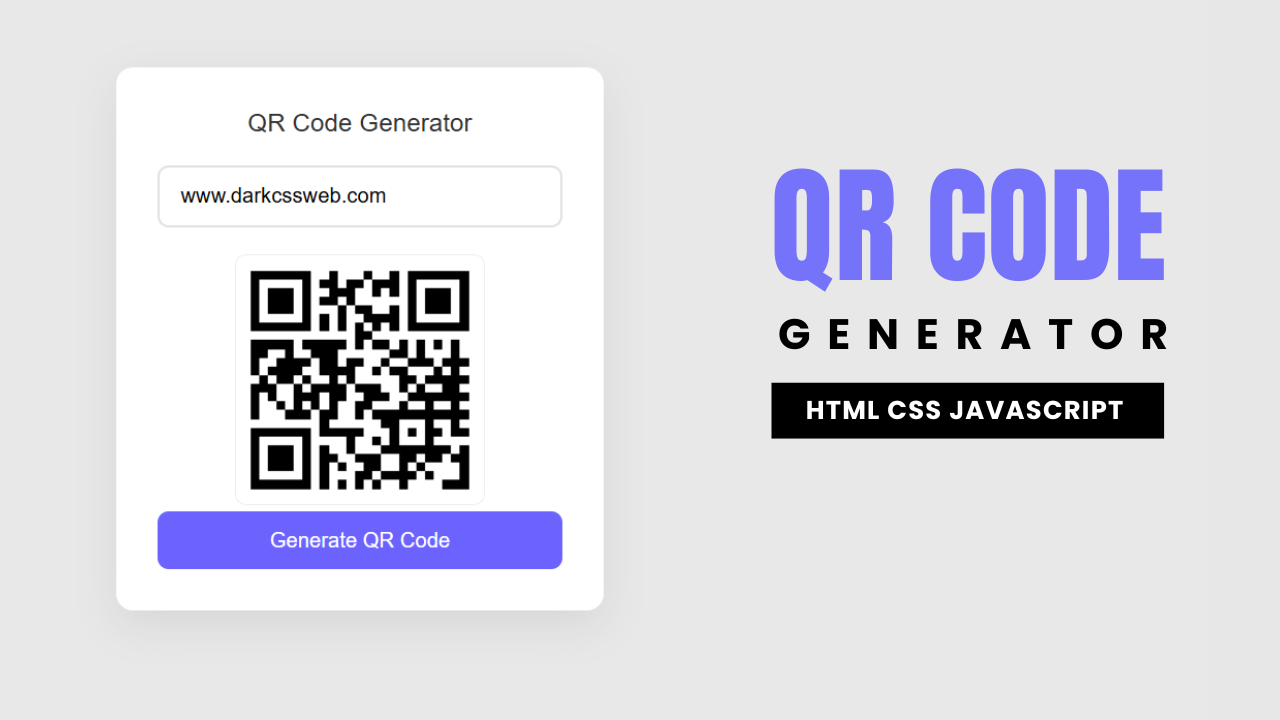
Welcome to this quick tutorial where we’ll create a Simple QR Code Generator using HTML, CSS, and JavaScript. In just a few minutes, you’ll learn how to build a clean and responsive UI where users can enter any text or URL and instantly generate a scannable QR code using a free API. This project is perfect for beginners who want to explore how APIs work and how to interact with them using JavaScript. Let’s get started!
Watch Full Tutorial on Youtube: Link
HTML Code
<!DOCTYPE html>
<html lang="en">

<head>
    <meta charset="UTF-8">
    <meta name="viewport" content="width=device-width, initial-scale=1.0">
    <title>Simple QR Generator</title>
    <link rel="stylesheet" href="style.css">
</head>

<body>
    <div class="container">
        <h1>QR Code Generator</h1>
        <input id="qr" type="text" placeholder="Enter text or URL">
        <div class="image">
            <img alt="QR Code" id="qrimg">
        </div>
        <button>Generate QR Code</button>
    </div>
</body>

</html>
Explanation:
Inside the <body>, a main container is created to hold all the content of the QR code generator. It includes a heading to label the tool, an input field where users can type text or paste a URL, and an image element that will display the generated QR code. Below the image, a button is placed that triggers the QR generation when clicked. Additionally, a script section is included at the bottom of the page to handle the QR code creation logic using JavaScript. The structure is simple and clean, ensuring easy readability and functionality.
CSS Code
....

@import url('https://fonts.googleapis.com/css2?family=Inter:wght@300;400;500&display=swap');

* {
    margin: 0;
    padding: 0;
    box-sizing: border-box;
    font-family: 'Inter', sans-serif;
}

body {
    display: flex;
    justify-content: center;
    align-items: center;
    min-height: 100vh;
    background-color: #e8e8e8;
}

.container {
    width: 90%;
    max-width: 350px;
    background: white;
    border-radius: 12px;
    padding: 30px;
    box-shadow: 0 10px 30px rgba(0, 0, 0, 0.08);
    text-align: center;
}

h1 {
    font-size: 18px;
    margin-bottom: 20px;
    color: #333;
    font-weight: 500;
}

input {
    width: 100%;
    padding: 12px 15px;
    border: 2px solid #e0e0e0;
    border-radius: 8px;
    font-size: 15px;
    outline: none;
    margin-bottom: 20px;
    transition: all 0.3s ease;
}

input:focus {
    border-color: #6c63ff;
    box-shadow: 0 0 0 3px rgba(108, 99, 255, 0.1);
}

#qrimg {
    width: 180px;
    height: 180px;
    margin: 0 auto;

    background: white;
    padding: 10px;
    border-radius: 8px;
    border: 1px solid #eee;
    transition: all 0.3s ease;
    opacity: 0;
}

#qrimg.show {
    opacity: 1;
}

button {
    background-color: #6c63ff;
    color: white;
    border: none;
    padding: 12px 25px;
    border-radius: 8px;
    font-size: 15px;
    font-weight: 500;
    cursor: pointer;
    transition: all 0.3s ease;
    width: 100%;
}

button:hover {
    background-color: #5a52e0;
    transform: translateY(-2px);
    box-shadow: 0 5px 15px rgba(108, 99, 255, 0.2);
}

button:active {
    transform: translateY(0);
}

...
Explanation:
The CSS begins by importing the ‘Inter’ font from Google Fonts to enhance the typography.
A universal selector is used to reset default margin and padding, apply box-sizing for consistent layout behavior, and set the font family globally.
The body is styled to center the content both vertically and horizontally using Flexbox, with a light gray background to give a clean look. The .container class defines a white card-like box with padding, rounded corners, and a subtle box-shadow to create a floating effect. The heading is styled with medium font weight and a slight margin for spacing.
The input field is designed to be full-width with inner padding, rounded borders, and smooth transitions on focus, including a subtle colored glow.
The QR code image is initially hidden with opacity: 0 and styled with a white background, padding, and rounded edges to appear neatly once generated. A .show class is used to make the image visible with a fade-in effect.
The button is styled with a vibrant purple color, smooth hover effects, and subtle motion and shadow for interactivity, enhancing the user experience.
JavaScript Code
...

function generateQR() {
  const input = document.getElementById("qr").value.trim();
  const img = document.getElementById("qrimg");
  const button = document.querySelector("button");

  if (!input) {
    alert("Please enter some text or URL");
    return;
  }

  img.src =
    "https://api.qrserver.com/v1/create-qr-code/?size=180x180&data=" +
    encodeURIComponent(input);
  img.classList.add("show");
}

// Generate QR when pressing Enter key
document.getElementById("qr").addEventListener("keypress", function (e) {
  if (e.key === "Enter") {
    generateQR();
  }
});

button.addEventListener("click", generateQR);

..
Explanation:
The JavaScript starts by defining a function that handles QR code generation. When the user clicks the button or presses the Enter key, this function is triggered.
It first retrieves the value entered in the input field and removes any extra spaces.
If the input is empty, an alert prompts the user to enter some text or a URL. If valid input is provided, the function dynamically updates the src attribute of the QR code image using an external API that generates QR codes based on the given data.
The input value is encoded to ensure it works safely within a URL. Once the image source is set, a class is added to make the QR code image visible with a smooth fade-in effect.
Additionally, an event listener is added to the input field to allow the user to press the Enter key to generate the QR code, making the tool more interactive and user-friendly.
Source Code:
Download “QR-Code-Generator.zip” QR-Code-Generator.zip – Downloaded 430 times – 1.78 KBConclusions:
In conclusion, this simple QR Code Generator project demonstrates how HTML, CSS, and JavaScript can work together to create a functional and responsive tool. It not only enhances your understanding of form handling and API integration but also helps improve your front-end development skills. This project is ideal for beginners looking to practice real-world JavaScript functionality in a visually appealing and interactive way.